The problem
Over the past couple years, my local network topology has grown. Apart from a router and few laptops connecting wirelessly on it, there are a couple of servers and Raspberry pi. In order to connect on each of these machines, I had to remember the individual IPs thus I decided to setup a local DNS server that will help me on this. Before I kept going with this small project I had to study a bit more around DNS server types, and understand the differences. The article A Comparison of DNS Server Types: How To Choose the Right DNS Configuration was the one that answered all my questions.
Network Topology
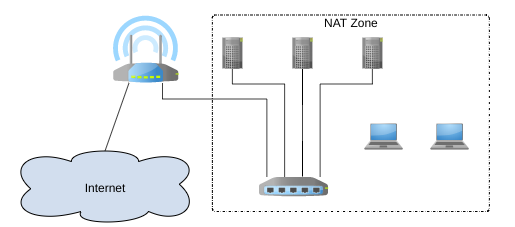
In the diagram you can see the network topology. It is not something fancy or complicated. A router that connects everything in the Internet, few machines that sit behind a switch, and few devices like laptops and tablets that connect wirelessly in the router. All the devices in my home network sit behind NAT.
Solution
I decide to use Raspberry Pi 3 with Centos 7 and Bind as my DNS server which I installed with the below command
yum -y install bind bind-chroot caching-nameserver
After connecting to the pi, we can start configuring the DNS server. The basic file that should be tweaked is the /etc/named.conf and the parts that I added:
/* A list of trusted IP that this DNS server */
/* will accept/answer requests */
acl "trusted" {
        localhost;
        localnets;
        192.168.0.0/24;
      };

  options {
        listen-on port 53 { 127.0.0.1; 192.168.0.X;
      };

	[...]

	/* from who will accept queries */
  allow-query     { trusted; };

  [...]

  /* The DNS server that will forwards requests */
	/* if this server is not authorized to answer. */
  forwarders {
    8.8.8.8;
    8.8.4.4;
  };
};

[...]

include "/etc/named.rfc1912.zones";
include "/etc/named.root.key";

/* File that we added and will contain the definitions of our zones.*/
include "/etc/named/named.conf.local";
Under the /etc/named/ create the file named.conf.local which will keep the definition of the local forward and reverse zones. I chose as my home domain icecream.local and all hosts to have names of icecream flavors.
zone "icecream.local" {
        type master;
        file "db.icecream.local"; # the file with the zone def
        allow-update { none; };
};
zone "168.192.in-addr.arpa" {
        type master;
        file "db.192.168"; # the file with the reverse zone def
        allow-update { none; };
};
Next step is to create the file with the zone definitions under the /var/named. The db.icecream.local looks like:
TTL 1d
icecream.local. IN  SOA ns.icecream.local. admin.icecream.local. (
    4 ; se = serial number
    3h         ; ref = refresh
    15m        ; ret = update retry
    3w         ; ex = expiry
    3h)         ; min = minimum

;The master name server

        IN NS ns.icecream.local.

;name server - A records
ns             IN      A       192.168.0.X

;private hosts
chocolate       IN      A       192.168.0.X
and the db.192.168 looks like:
$TTL    1d
@ IN  SOA ns.icecream.local.  admin.icecream.local. (
    4 ; se = serial number
    3h         ; ref = refresh
    15m        ; ret = update retry
    3w         ; ex = expiry
    3h         ; min = minimum
    )

    IN    NS    ns.icecream.local.

; local name servers, reverse lookup
0.X     IN    PTR    ns.icecream.local.

;private hosts
0.X     IN    PTR    chocolate.icecream.local.
The syntax of named.conf can be checked with the command:
sudo named-checkconf
and the syntax of the zone file with the command:
sudo named-checkzone zone-name /path/to/zoneFileDefinition
Up to this point we have configured our local DNS. The next step is to start the DNS service:
systemctl enable named
systemctl start named
and configure the firewall by opening the port 53 where the DNS server is by default:
firewall-cmd --permanent --add-port=53/tcp
firewall-cmd --permanent --add-port=53/udp
firewall-cmd --reload
and the persmissions :
chgrp named -R /var/named
chown -v root:named /etc/named.conf
restorecon -rv /var/named
restorecon /etc/named.conf
And that’s it, the Local DNS server is up and running, but not used yet.
In order for this DNS server to be used by your local machines you need to configure your rooter accordingly. Whenever a machine is connected to a network, it requests IP from the DHCP server. This server apart from the address, is also responsible to define the DNS servers that should be used. You can add you newly local DNS server to your router’s configuration and verify that everything is working by dig-ing for your new domain.