
A few months back, I obtained two Yubikeys, one master and one as a backup, to use as two-factor devices. I specifically acquired the Yubikey 5C NFC. The result was me going down the rabbit hole to know more about how the key works, the protocols, and the setup. A by-product is this blog post.
Disclaimer: I should mention that I am not a security expert; I am just a curious geek that likes to understand how things work and how to use them.
What is a Yubikey?
A Yubikey is a USB hardware authentication device that supports one-time passwords (OTP), public-key cryptography, authentication, the Universal 2nd Factor (U2F), and FIDO2 protocols developed by the FIDO Alliance.
Software to manage it
The YubiKey Manager, aka ykman, is a cross-platform application for managing, as the name indicates, and configuring a key via a graphical user interface and a command-line interface. For installing it, I chose to use the AppImage file, following the below steps:
wget https://developers.yubico.com/yubikey-manager-qt/Releases/yubikey-manager-qt-latest-linux.AppImage
sudo mv yubikey-manager-qt-1.2.4b-linux.AppImage /usr/local/yubico/
sudo chmod +x yubikey-manager-qt-1.2.4b-linux.AppImage
sudo ln -s /usr/local/yubico/yubikey-manager-qt-1.2.4b-linux.AppImage /usr/local/bin/yubikey-manager
For more detailed usage of the Yubikey Manager, you can read this online documentation.
Interfaces of Yubikey - Physical Interfaces
The ways that a computer, phone, etc., can communicate with a Yubikey are referred to as physical interfaces. The Yubikey 5 NFC provides a USB interface and an NFC interface. I only used the yubikey via USB and disabled the NFC through the yubikey-manager.
USB Interfaces
The USB interfaces are how Software can communicate with the yubikey when connected via USB. Each interface enables a set of applications on the Yubikey.
OTP - One-time password
The OTP interface presents itself to the operating system as a USB keyboard, giving access to the OTP application. Subsequently, the OTP application can be used in any environment that accepts standard keyboard input.
FIDO
The FIDO interface gives access to the U2F and FIDO2 applications. U2F, which stands for Universal 2nd Factor, is an open authentication standard that simplifies two-factor authentication. Using Yubikey with the U2F application, user login is bound to the origin, meaning that only the original site can authenticate with the key. FIDO2 Project is the successor of the U2F. It consists of the WebAuthn standard and the FIDO Client to Authenticator Protocol 2. The FIDO2 application on the YubiKey allows for the storage of resident credentials, such as the username and other data. It enables passwordless authentication on sites and applications that support the WebAuthn protocol. The FIDO interface presents itself as a generic human interface device (HID).
CCID
With the CCID interface, the Yubikey presents itself to the operating system as a USB smart card reader. This interface provides communication for the Smart Card, OATH, and OpenPGP applications. Each application presents itself as a separate smart card attached to that reader.
The Applications I used
If you have reached this point, it is evident that the Yubikey has many usages and applications. I have used two of them:
- U2F
- OpenPGP smart card for SSH authentication and signing commits.
Setting up a YubiKey as a second factor is easy - the browser walks you through the entire process. But configuring the Yubikey for SSH authentication and signing commits through OpenPGP smart card is another story with many parts to understand.
SSH authentication & Signing commits
OpenPGP is the most widely used email encryption standard. It is defined in the RFC 4880 by the OpenPGP Working Group of the Internet Engineering Task Force. It describes a protocol for using public-key cryptography for encryption, signing, and key exchange, based on Phil Zimmermann’s Pretty Good Privacy original work. The GnuPG, aka gpg, is a complete and free implementation of the OpenPGP and generates encryption keys in Linux systems and not only.
Setting up the Yubikey
With the command gpg --card-status, we can see information about our yubikey and verify that GPG can see the card.
The next step is to change the PIN for the OpenPGP application. A YubiKey can have up to three PINs - one for its FIDO2 function, one for PIV, and one for OpenPGP. The GPG interface is separate from the PIV interface, and it has its own PIN, Admin PIN, and Reset Code. Entering the user PIN incorrectly three times will cause the PIN to become blocked; it can be unblocked with the Admin PIN or Reset Code. Entering the Admin PIN or Reset Code incorrectly three times destroys all GPG data on the card, and the Yubikey will have to be reconfigured.
| Name | Default Value | Usage |
|---|---|---|
| PIN | 123456 | decrypt and authenticate (SSH) |
| Admin PIN | 12345678 | reset PIN, change Reset Code, add keys and owner information |
| Reset PIN | None | Reset |
We use the command: gpg --card-edit for configuring the device, which will open an interactive session. Typing admin
will enable the editing of properties and PINs.
gpg/card> admin
Admin commands are allowed

gpg/card> passwd
gpg: OpenPGP card no. {identifier} detected

1 - change PIN
2 - unblock PIN
3 - change Admin PIN
4 - set the Reset Code
Q - quit

Your selection? 1
PIN changed.

1 - change PIN
2 - unblock PIN
3 - change Admin PIN
4 - set the Reset Code
Q - quit

Your selection? 3
PIN changed.

1 - change PIN
2 - unblock PIN
3 - change Admin PIN
4 - set the Reset Code
Q - quit

Your selection? q

gpg/card> name
Cardholder's surname: Protopapa
Cardholder's given name: Anastasia

gpg/card> quit
Setting up GPG
Each YubiKey can store three separate keys for signing, encrypting, and authenticating. So the GPG keys we should generate for each Yubikey are:
- A master GPG, if there is not one already. The master key has the capabilities of signing [S] and certification [C]
- A sub-key for encrypting, which is marked with [E]
- A sub-key for authenticating, which is marked with [A]
You can list the secret keys in your system with the gpg --list-secret-keys command.
If you already have a master key, you can add the extra sub-keys with the gpg --quick-add-key {your-key-id} rsa4096 auth 4y command.
Transfer GPG key to Yubikey
Transferring keys to YubiKey using keytocard is a destructive, one-way operation only. Make sure you back up your keys before moving them to the smartcard.
gpg --edit-key $KEY_ID
gpg (GnuPG) 2.2.27; Copyright (C) 2021 Free Software Foundation, Inc.
This is free software: you are free to change and redistribute it.
There is NO WARRANTY, to the extent permitted by law.

Secret key is available.

[...]

gpg> keytocard
Really move the primary key? (y/N) y
Please select where to store the key:
   (1) Signature key
   (3) Authentication key
Your selection? 1

[..]

gpg> key 1

[...]

gpg> keytocard
Please select where to store the key:
   (2) Encryption key
Your selection? 2

[...]

#deselect key 1
gpg> key 1

#select key 2
gpg> key 2

[...]

gpg> keytocard
Please select where to store the key:
   (3) Authentication key
Your selection? 3

[...]

gpg> q
Save changes? (y/N) y
The ssb> in the output of the gpg -K indicate that the keys have been moved to the card.
GPG key for SSH Authentication
Using my GPG key for SSH Authentication was not straightforward, and I had to understand how SSH and GPG software components operate and integrate.
As seen in the post SSH as Simple as Possible, ssh client
uses the ssh-agent to access the unencrypted keys in memory. They communicate through a Unix file socket, which path is
stored in the environmental variable: SSH_AUTH_SOCK.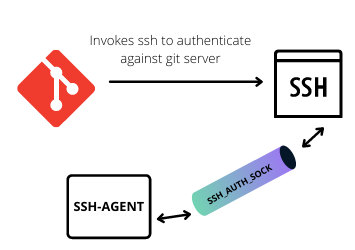
The GPG software components have similar architecture. The GPG client uses the gpg-agent to access the key through
the Unix domain socket, which is stored in the environmental variable: GPG_AGENT_INFO. The gpg-agent can also be
an ssh-agent.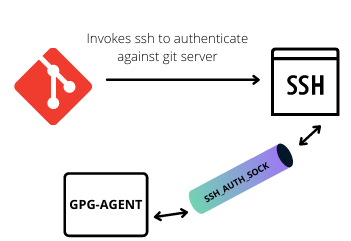
So to use the GPG key for SSH authentication, we need to tell the ssh client to use the gpg-agent
instead of the ssh-agent.
How to replace ssh-agent with gpg-agent
To get gpg-agent to handle requests from SSH, we need to update the ~/.gnupg/gpg-agent.conf with the below:
echo "enable-ssh-support" >> ~/.gnupg/gpg-agent.conf
echo "use-standard-socket" >> ~/.gnupg/gpg-agent.conf
Next, we need to specify the keys in the ~/.gnupg/sshcontrol file, so we do not have to use ssh-add for loading the keys.
The entries in this file are internal identifiers that the gpg-agent uses for referring to keys, called keygrip. Unlike a key hash,
a key grip refers to public and private gpg keys. We can find the key grip with the gpg -K --with-keygrip command.
We add the key grip of the authentication sub-key to the sshcontrol file.
For the last step, we need to tell ssh-client how to access the gpg-agent by changing the value of the SSH_AUTH_SOCK environment variable.
# configure SSH to use GPG
echo 'export SSH_AUTH_SOCK=$(gpgconf --list-dirs agent-ssh-socket)' >> ~/.bashrc

# start gpg-agent, if it isn't started already
echo 'gpgconf --launch gpg-agent' >> ~/.bashrc
echo 'gpg-connect-agent /bye' >> ~/.bashrc

# Set an environment variable to tell GPG the current terminal.
echo 'export GPG_TTY=$(tty)' >> ~/.bashrc
Having reached this point, log out and log in again. Running ssh-add -L should show your public gpg key in SSH format.
GPG keys and Github
In theory, now the ssh will use the gpg-agent and subsequently the gpg key for authenticating against any server we try to connect, including Github.
In Github, we need to add a new ssh key, the output of the command ssh-add -L. Similarly, and on the same page, we need to add our GPG key, which value we can get with: gpg --armor --export {your-key-id}.
Once you have configured Github, ssh git@github.com will successfully open a connection.
GPG key for Signing commits
For configuring Git to sign commits, and tags automatically, we need the below global git configuration:
git config --global commit.gpgsign true
git config --global tag.gpgSign true
git config --global user.signingkey {your-key-id}
Disable Gnome Keyring
GNOME Keyring is a daemon program that caches users’ secret keys, login credentials, and certificates and makes them available to other applications requesting them according to the GnuPG protocol. Essentially GNOME Keyring plays the same role as gpg-agent but is active only within GUI desktop sessions. GNOME Keyring also implements SSH agent protocol for SSH authentication to replace ssh-agent.
I prefer to rely on the original gpg-agent or ssh-agent, instead of GNOME Keyring, for all security operations. Permanently disable Gnome Keyring SSH Agent by including this line in /etc/xdg/autostart/gnome-keyring-ssh.desktop.
X-GNOME-Autostart-enabled=false
Reboot and test that private key passwords aren’t remembered.
Some general thoughts
Using standard SSH keys for git authentication offers the same level of security with less complexity. One of the positives of having your keys in a Yubikey is that you can use them in more than one machine, and you do not need to have as many keys as your machines.